• Skip to primary navigation
  • Skip to main content
  • Skip to primary sidebar
  • Skip to footer

Wilson Homestead

  • Home
  • About
    • About
    • Contact Me
    • Media Kit
    • Disclosure and Policy
  • Blog
    • Ancestral Eating
    • Milk Cow
    • Homesteading
    • Our Farmhouse
  • Courses
    • Natural Cleaning Course
  • Videos
  • Raw Milk Herdshares
  • Shop
    • Some Of Our Favorite Products (+ coupon codes)
    • Ebooks
    • Amazon Storefront
    • Handmade Products
    • Free Canning Ebook
  • Cart
    • Register
    • Sign-In
    • Checkout

How To Dry Herbs + Spices

August 19, 2017 by wilsonfamilyhomestead Leave a Comment

Tweet
Pin
Share
0 Shares

Do you grow fresh herbs in your garden or have some naturally growing in your backyard? You can easily preserve some of the extra herbs and have them on hand for use all year! I personally love using and experimenting with a lot of herbs and spices in my cooking, and especially when I’ve harvested and preserved them myself!

Drying herbs through air drying or dehydration is one of the fastest and easiest ways to preserve them. Plus, store bought herbs and spices are usually expensive for the small amount that you get. So you’re saving money and also ensuring that your herbs are grown organically.

Herbs usually refer to the leaves of plants and can be used fresh or dried. Spices are from the bark, berries, root, stem, seed, or other part of the plant and are typically used dried and powdered. Almost any herb or spice can be dried at home to preserve it for up to a year.

There are some steps to harvest your herbs or spices correctly. First, they are best harvested in the morning before about 10am for maximum potency, since beneficial oils in the plant have not yet been affected by the sun. Second, leaves that are harvested should be fresh and green, we don’t want any wilted or discolored leaves here y’all! Seeds should be harvested when they start to turn brown and harden, but before they naturally start to fall off the plant. Flowers can be harvested by carefully clipping the head off shortly after they bloom.

Now, you have several method options for drying your herbs and spices.

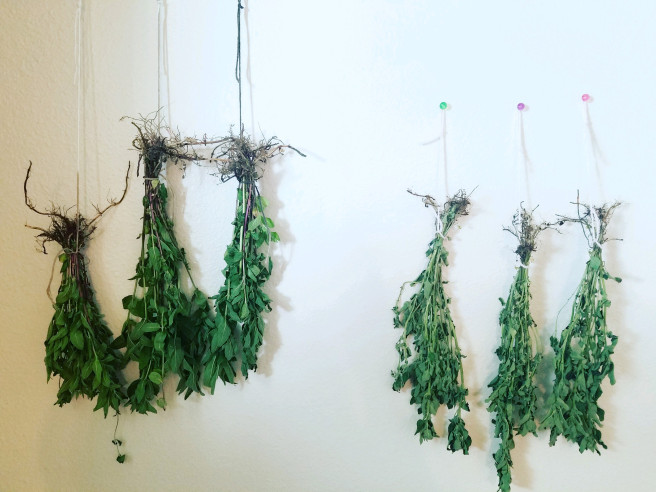
Air Drying. Gather the herbs in small bunches and tie the stems with a piece of twine or string. Hang the bundles in a well ventilated area of the house, out of direct sunlight. This drying process usually takes about a week or so.

If it is still warm outside you can solar dry the herbs in indirect sunlight with the same method.

Remove leaves from the stems and store.

There is also another method you could use (which I personally haven’t tried yet).

Oven Drying. It sounds easy but supposedly it is one of the more difficult methods to preserve the quality of the herbs because the temperature must stay low.

Remove the leaves from the stems, and put them on a baking sheet in a single layer. Preheat the oven to the lowest setting. For most ovens it is around 170 degrees F (which is still kinda high). You can also prop your oven door open with the handle of a wooden spoon to let the air circulate. Make sure you keep checking the temperature often, its best if it’s between 100 and 120 degrees F. They tend to dry quickly with this method. Remove them when the leaves start to crumble and no longer bend without breaking.

You can also use a dehydrator with a fan and adjustable temperature. It is the most efficient way to preserve herbs fast and still keep the beneficial properties of the herb or spice intact. But make sure you avoid using a microwave to dry them!

Storing Them

The best way to preserve them is to avoid breaking them up or powdering them until they are needed for use. Store leaves in clean glass jars or air tight containers. It’s a good idea to label them right away to avoid confusing them, as many herbs look the same one dried.

And boom!

Now you have your own dried herbs and spices to use in recipes!

Tweet
Pin
Share
0 Shares

Filed Under: Garden, Homemade, Homesteading, In The Kitchen

Previous Post: « Plantain Tincture
Next Post: How To Season Cast Iron »

Reader Interactions

Leave a Reply Cancel reply

Your email address will not be published. Required fields are marked *

Recipe Rating


Primary Sidebar

Join the Wilson Homestead community!

* indicates required

Most recent posts

  • How to test your cow for A2/A2
  • Holiday Gift Guide 2024
  • The Car Birth Story Of Elodie Charlotte
  • Preventing tooth decay in pregnancy
  • How to handle raw milk properly
  • Clean the air in your home
  • Prenatal vitamin regimen
  • Apple Cider Jello for Fall
  • What I Keep On Hand For Ticks
  • How to calf share

Blog Categories

  • Ancestral Eating (24)
  • Baby (12)
  • Baking (11)
  • Beverages (10)
  • Birth (10)
  • Breakfast (7)
  • Breastfeeding (4)
  • Canning (12)
  • Christmas (9)
  • Cleaning (6)
  • Cloth Diapering (2)
  • Coffee (5)
  • Curing Meat (2)
  • Decor (4)
  • Dehydration (1)
  • Dogs (1)
  • Farm Animals (4)
  • Farming (17)
  • Fermented (11)
  • Food Preservation (9)
  • Foraging (1)
  • GAPS Diet (8)
  • Garden (7)
  • Handmade Home (11)
  • Health (42)
  • Healthy Snacks (5)
  • Herbs + Natural Healing (7)
  • Homemade (57)
  • Homesteading (27)
  • In The Kitchen (61)
  • Markets (1)
  • Marriage (2)
  • Menstural Cycle (3)
  • Milk Cow (10)
  • Minimalism (2)
  • Motherhood (18)
  • Natural Health (17)
  • Non-Toxic Beauty (6)
  • Our Farmhouse (21)
  • Our Farmhouse On Acreage (7)
  • Our Home (28)
  • Our Old Farmhouse In Town (9)
  • Postpartum (10)
  • Poultry (2)
  • Pregnancy (13)
  • Preparedness (5)
  • Products (9)
  • Recipes (64)
  • Remedies (1)
  • Renovation (10)
  • Reviews (1)
  • Shepherdess (1)
  • Sleep (1)
  • Soapmaking (1)
  • Sourdough (6)
  • Supplements (4)
  • Sustainable Clothing (1)
  • Uncategorized (2)
  • Videos (5)
  • Zero Waste (3)

Wilson Homestead Podcast

Wilson Homestead
Wilson Homestead

Simple life in the farmhouse. And all the things I’m passionate about! Motherhood, homesteading, food from scratch, a handmade home!

Listen OnApple PodcastsListen OnExternal
10 Reasons Why We Chose Muscovy Ducks (And Why You Should Too)
byMegan Wilson

Never miss new content! Sign up for our email list here

All my videos are on Odysee as well!!

This post may contain affiliate links, which means I make a small commission at no extra cost to you. As an Amazon Associate, I earn from qualifying purchases. Shop the Wilson Homestead Amazon shop

Enroll in Doterra

Enroll in Young Living

WATCH SOME YOUTUBE VIDEOS \\

Farmhouse playlist 

Homesteading playlist

My pregnancy playlist

WHERE ELSE CAN YOU FIND US? \\

MAILING ADDRESS: PO BOX 921 Hamilton, Mt 59840

MY BLOG

MY WEBSITE

HANDMADE PRODUCT SHOP

INSTAGRAM

FACEBOOK

PATREON

MY ETSY SHOP

10 Reasons Why We Chose Muscovy Ducks (And Why You Should Too)
May 7, 2022
Megan Wilson
Results I’ve Seen From The GAPS Diet | How has it been going?
March 31, 2022
Megan Wilson
Our Natural + Healthy Dental Routine | Re-mineralizing + Healing Tooth Decay
March 23, 2022
Megan Wilson
I started the GAPS diet | Why the GAPS diet? And what is it? Let’s chat!
January 17, 2022
Megan Wilson
What I Used Most Postpartum After Baby #3 | Postpartum Essentials & Favorites
December 6, 2021
Megan Wilson
Why Luke Is Starting The Keto Diet | What Is Keto? | Part 1
December 3, 2021
Megan Wilson
2 & 3 Month Postpartum Mama Update | Pelvic Floor Physical Therapy, Thyroid, Weight Loss, Core Work
November 12, 2021
Megan Wilson
Vivian’s 2 & 3 Month Update
November 8, 2021
Megan Wilson
The Home Water Birth Of Vivian Louise | Positive Home Birth Story
November 1, 2021
Megan Wilson
Making Breastmilk Jewelry?? Lackto Breastmilk Jewelry Kit Instructions | Beautiful Nursing Keepsake
October 29, 2021
Megan Wilson
Search Results placeholder

Blog Archives

Footer

Subscribe

* indicates required

Copyright © 2025 Wilson Homestead on the Foodie Pro Theme