How To Make Water Kefir. A super simple and delicious way to get yet another fermented, beneficial-bacteria-packed drink into your life!
This post may contain affiliate links. Read my disclosure policy here.
What! Y’all think I’m obsessed with fermenting stuff?
What would give ya that idea?
Ok yeah, maybe I am just a little but obsessed….
But it’s all so healthy! So it’s a good obsession I think haha
Today I’d like to share how I make my water kefir! I also have a YouTube video that goes along with this post if you’d rather watch than read.
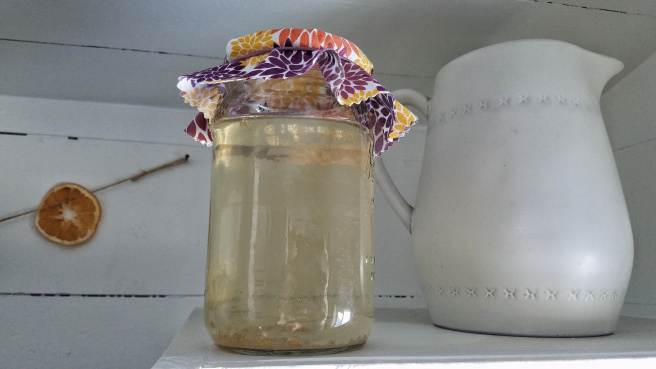
How To Make Water Kefir
But let’s get on with it now!
You’ll need:
- 2 to 3 tbsp kefir grains
- 3 cups filtered water
- 1/4 cup organic cane sugar
Step one: boil 1 cup of water and add it to a quart mason jar with your 1/4 cup sugar and stir until dissolved.
Step two: add 2 cups of cold water to the mason jar. Feel the outside of the jar to see what the temperature is. We want to make sure the water isn’t too hot to add our kefir grains. If we put them in boiling water they would die. So if the water is just warm to the touch than it’s ok to add the grains. You can let it cool to room temp if you’re worried about it though, but I always just add them when it’s just a little warm and they are doing good!
Step three: Strain the kefir grains out of your last batch and measure out 2 to 3 tablespoons into the new sugar water that we just made. Any extra that you have you can either make a new batch with, give to a friend, put them in storage, or whatever you’d like!
Now to let it sit!
Step four: Put a muslin cloth over the mason jar and secure with a rubber band or hair tie. Place it on your countertop and leave it for 24 to 48 hours. I usually do 48 hours because we like it a little stronger, but also keep in mind that the warmer your house is the faster it will ferment. Our house is typically around 70 degrees. You can just take a little taste and see if you like it until you get a feel for how long it takes.
Step five: Once it’s done fermenting repeat all the previous steps and then it’s ready to drink!
I usually do a second ferment as well – you just add some fruit or fruit juice or spices and sugar and leave out for another 24 to 48 hours with a sealed lid on the jar. I’ll do another post with more details on the second ferment soon!
And that’s how ya make water kefir!
I hope that was helpful for y’all!
Blessings!
[…] made water kefir in the past, but I always come back to the good ol’ milk […]