Earlier this year we went huckleberry picking, and those of you who have done that before will know that it is tedious and time consuming.
We worked for hours and got less than a pound….
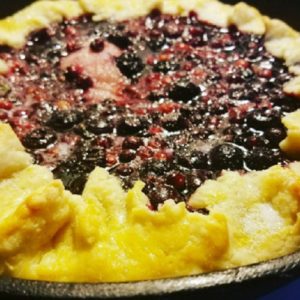
Anyway, some of the few berries that we did harvest were put to use in this blueberry and huckleberry galette – my very favorite alternative to a pie.
Although “galette” sounds fancy, it is essentially a pie. A thick, soft crust envelops sweet, runny fruit of your choosing. I love it’s rustic, non-fussy nature.
This recipe is for one galette…but really…I should have made several.
We shall start with the crust. You will need:
- 1 1/2 cups flour
- 1/2 teaspoon organic sugar
- 1/4 teaspoon salt
- 9 tablespoons cold butter, cut in 1/2 inch slices
- 4 – 5 tablespoons ice water
In a large bowl, whisk the flour, sugar, and salt. Using a pastry cutter or your fingertips, work the butter into the mixture until most of it resembles coarse meal with some pea-sized pieces. Form a well in the center. Sprinkle with 4 Tbs. of the ice water. Mix with your fingertips until the dough holds together enough to form a ball. If too dry, add the remaining water by the teaspoon, and mix until the dough comes together.
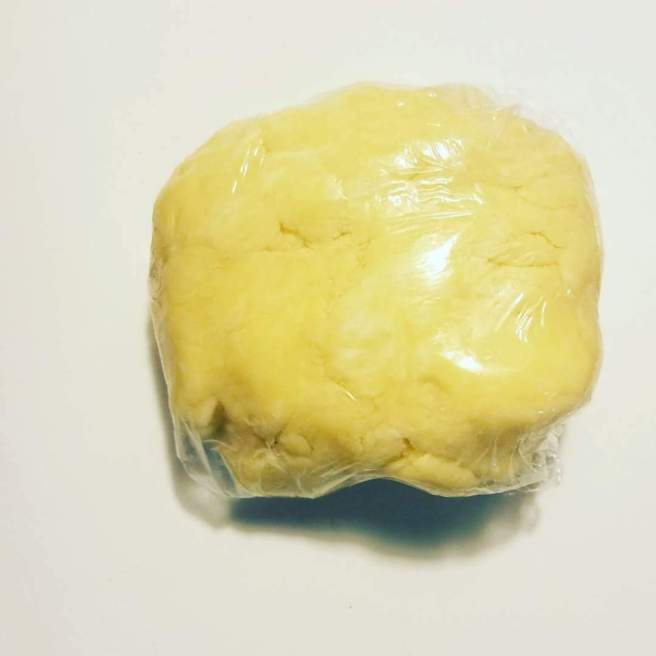
Roll the dough up into a ball and wrap it tightly in plastic wrap. Then refrigerate for at least 1 hour or up to 2 days before rolling out. I just did 1 hour. Cause, ya know, why refrigerate it longer when you’ve got to eat it up man!
While that is waiting in the refrigerator we will make our berry filling.
You’ll need:
- 1 cup huckleberries
- 1 cup blueberries
- 1/3 cup organic sugar
- 2 tablespoons arrowroot
- 5 to 10 drops lemon essential oil
- tiny pinch of salt
- 1 tablespoon butter – pea sized pieces
- 1 egg
- 2 more tablespoons organic sugar
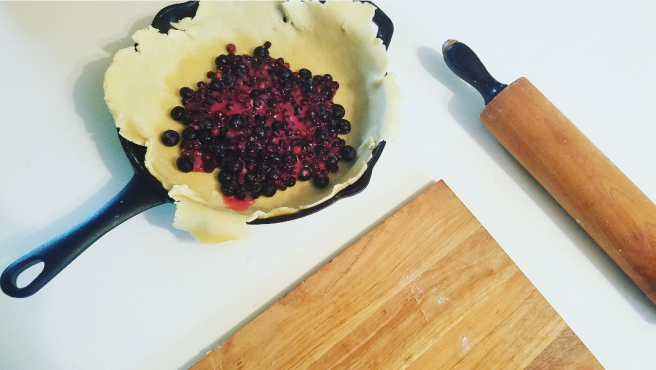
Preheat the oven to 425. Get out your cast iron skillet (you can use a cookie sheet also). Roll out the refrigerated pie crust so its large enough for your cast iron and set it inside.
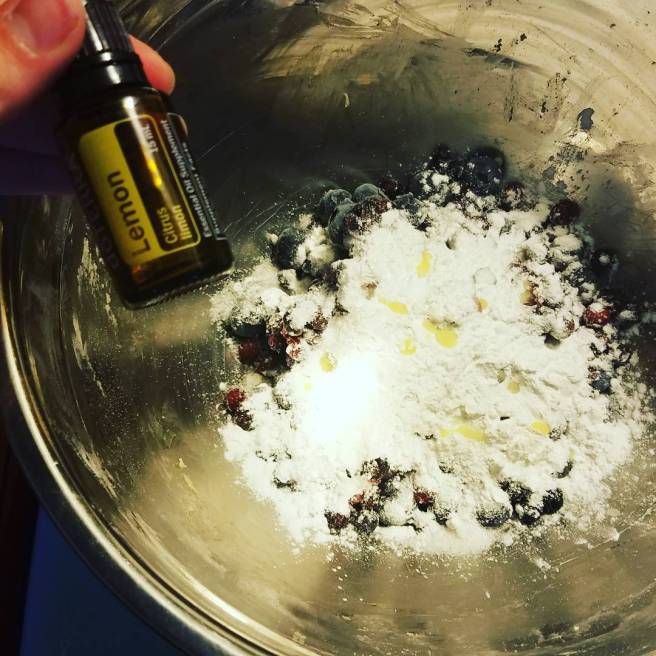
In a bowl mix the berries (ok to use unthawed frozen berries), sugar, arrowroot, lemon essential oil and pinch of salt.
Spoon the berry mixture onto the center of the pie crust.
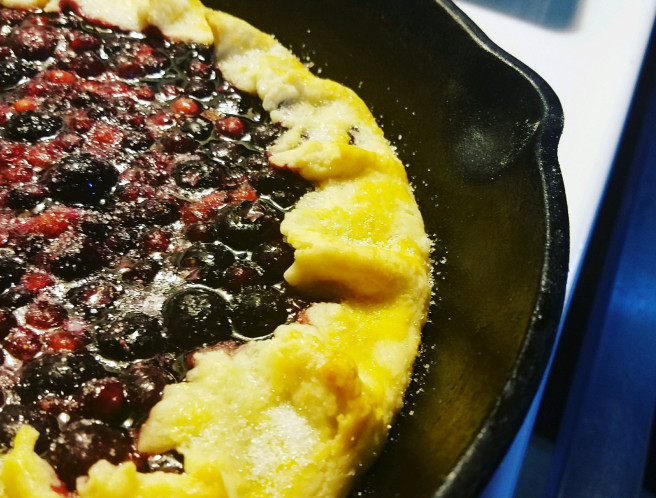
Gently pinch up the sides of the pie crust to make crust bowl for the berry mix. Pull the edges in towards the center as you pinch around the outside of the pie crust. Dot the top of the galette with the pea-sized butter pieces. When completed, set aside.

In a small bowl whisk the egg and a splash of coconut oil together. Paint the edges of the pie crust with the egg wash (this gives it the golden brown color). When done, sprinkle the edges with the remaining 2 tablespoons of sugar.
Place in the oven on the center rack and bake for 20-25 minutes. Remove when the crust is golden and the center is bubbly.
Allow the galette to cool before slicing and serving.
It’s so hard to totally let the galette cool before some greedy hands find their way to it’s crispy, sugary crust. Fine… I’ll admit… those greedy hands were mine. But the way I see it – if I cook it, I get to eat it, y’all. And the role of taste-tester is not to be taken lightly around these parts.

I feel very blessed to be able to share this recipe with y’all! I hope you enjoy it as much as we did!
Huckleberry / Blueberry Galette
Ingredients
Crust
- 1 1/2 cups flour
- 1/2 tsp organic cane sugar
- 1/4 tsp salt
- 9 tbsp cold butter (cut into 1/2in slices)
- 4-5 tbsp ice water
Filling
- 1 cup huckleberries
- 1 cup blueberries
- 1/3 cup organic cane sugar
- 2 tbsp arrowroot powder
- 5-10 drops lemon essential oil
- 1 pinch salt
- 1 tbsp butter pea sized pieces
- 1 egg
- 2 tbsp more organic cane sugar
Instructions
Making the crust
- In a large bowl, whisk the flour, sugar, and salt. Using a pastry cutter or your fingertips, work the butter into the mixture until most of it resembles coarse meal with some pea-sized pieces. Form a well in the center. Sprinkle with 4 Tbs. of the ice water. Mix with your fingertips until the dough holds together enough to form a ball. If too dry, add the remaining water by the teaspoon, and mix until the dough comes together.
- Roll the dough up into a ball and wrap it tightly in plastic wrap. Then refrigerate for at least 1 hour or up to 2 days before rolling out.
- Preheat the oven to 425. Get out your cast iron skillet (you can use a cookie sheet also). Roll out the refrigerated pie crust so its large enough for your cast iron and set it inside.
Making the filling
- In a bowl mix the berries (ok to use unthawed frozen berries), sugar, arrowroot, lemon essential oil and pinch of salt.
- Spoon the berry mixture onto the center of the pie crust.
- Gently pinch up the sides of the pie crust to make crust bowl for the berry mix. Pull the edges in towards the center as you pinch around the outside of the pie crust. Dot the top of the galette with the pea-sized butter pieces. When completed, set aside
- In a small bowl whisk the egg and a splash of coconut oil together. Paint the edges of the pie crust with the egg wash (this gives it the golden brown color). When done, sprinkle the edges with the remaining 2 tablespoons of sugar.
- Place in the oven on the center rack and bake for 20-25 minutes. Remove when the crust is golden and the center is bubbly.
- Allow the galette to cool before slicing and serving.
Leave a Reply