• Skip to primary navigation
  • Skip to main content
  • Skip to primary sidebar
  • Skip to footer

Wilson Homestead

  • Home
  • About
    • About
    • Contact Me
    • Media Kit
    • Disclosure and Policy
  • Blog
    • Ancestral Eating
    • Milk Cow
    • Homesteading
    • Our Farmhouse
  • Courses
    • Natural Cleaning Course
  • Videos
  • Raw Milk Herdshares
  • Shop
    • Some Of Our Favorite Products (+ coupon codes)
    • Ebooks
    • Amazon Storefront
    • Handmade Products
    • Free Canning Ebook
  • Cart
    • Register
    • Sign-In
    • Checkout

Kombucha

June 6, 2017 by wilsonfamilyhomestead 2 Comments

Tweet
Pin
Share
0 Shares
Jump to Recipe

It’s kombucha time!  Time to man up!

We are going to be making something that may not be everyone’s cup of tea.

Well, fermented sweet tea that is.

And I know it isn’t for everyone, because my first interaction with this beverage had me plugging my nose and declaring it smelt of stinky laundry.

Perhaps I exaggerate a little.  I have been known to do that at times.  I have since come to love it in all it’s uniqueness.

But it does have a special vinegary aroma.  You will see what I am talking about when you brew your own….

You will need:

  • 4 organic black tea bags
  • 1/2 cup organic sugar
  • 3 quarts water
  • 1/2 cup brewed kombucha – reserved from a previous batch of tea.
  • Mother Scoby
  • Gallon jar – or your choice of the fermentation vessel

Step One:  Bring the water to a boil in a pot.

Step Two:  Remove pot from heat and add your tea and sugar.

Step Three:  Steep the tea in the water until the liquid has completely cooled to room temperature.  This is important because we don’t want the heat of the liquid to kill our good bacteria!

Step Four:  Once cooled, remove and discard the tea bags.  Pour the sweetened tea in your gallon canning jar.  Big glass jars always work well for me – but just make sure and use something that has a large surface area.  Think wide.  You want the scoby to be able to grow over the surface of the liquid.  Do not use a metal container.

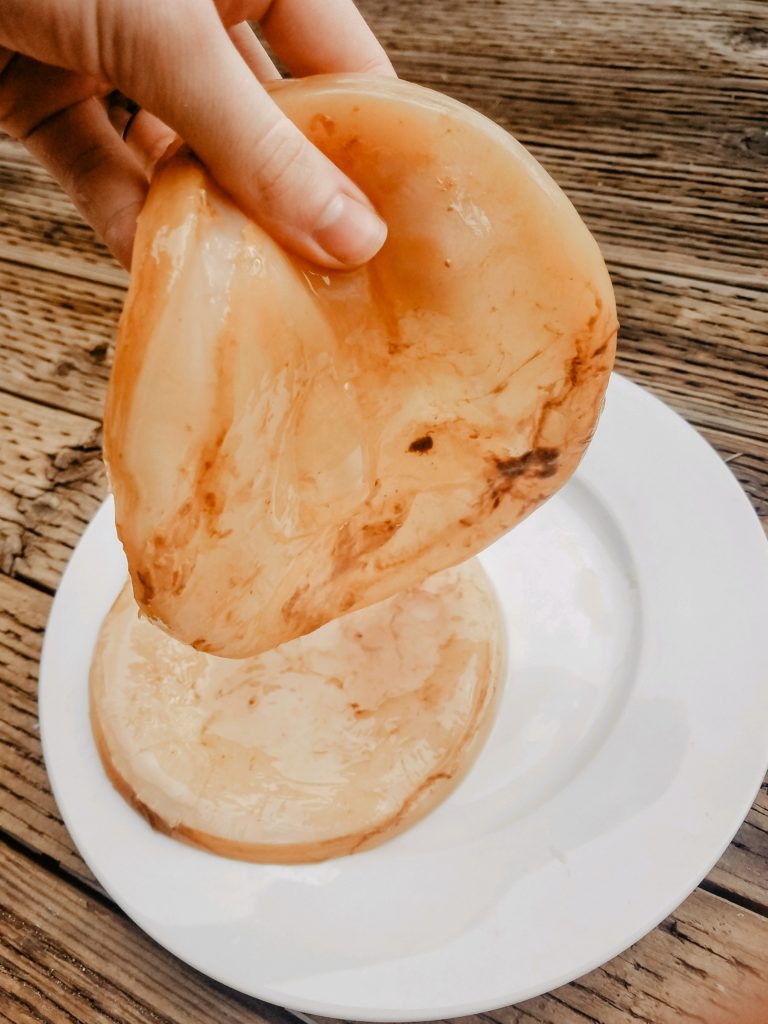
Step Five:  Add your scoby to the liquid.  Plop!

Step Six:  Pour in your cup of brewed kombucha.

Step Seven:  Cover the liquid and allow it to hang out for a week or so.  I cover mine with a paper towel doubled up and secured with a hair tie.  But you could use a thin cloth – just make sure that its not air tight or the scoby will die, it needs to be able to breathe.  Try to keep the container warm, but not hot.  Between 75 and 85 degrees is ideal.  The warmer the environment is, the faster the scoby will grow.  You can let your batch go anywhere from a week to 3 weeks.

Step Eight:  After a week or so, test your batch!  This is where personal preference comes in.  Some people, like me, like their kombucha very acidic.  Some people like it a little more sweet.  The longer you let the kombucha sit, the more acidic it will become, because the longer it sits the more sugar the scoby eats.

Step Nine: When you are ready to bottle, just remove the scoby (you will now have two: your original scoby you started with and a new one that has grown on the surface of the kombucha), along with 1 cup of the kombucha liquid that you will reserve for using in the next batch.

The mother scoby will become stronger and get more active each time it is used to prepare a new batch of kombucha tea, in which a new baby scoby will also grow.  (Baby scobys may be discarded or given to friends.)  When the mother scoby matures and is sufficiently strong, it will be much thicker and able to complete the fermentation process much faster than in previous batches.

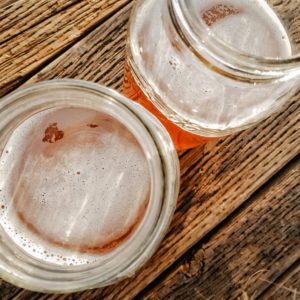
Step Ten: You can store the brewed kombucha in whatever container you would like – I like using half gallon or quart mason jars.  Use what you got – as long as you can get a nice, tight seal on the lid and it is sterilized and clean.  The beverage will continue to carbonate as it sits.  Keep ’em in the fridge once they are bottled.

Join the underground moonshine, I mean kombucha, revival.  Your body will thank you.

Home brewing.  Now THERE’S something that belongs on a homestead.

Kombucha

wilsonfamilyhomestead
Print Recipe Pin Recipe

Equipment

  • Glass gallon jar – or your choice of fermentation vessel

Ingredients
  

  • 4 bags organic black tea
  • 1/2 cup organic cane sugar
  • 3 quarts water
  • 1/2 cup brewed kombucha (reserved from previous batch)

Instructions
 

  • Bring the water to a boil in a pot.
  • Remove pot from heat and add your tea and sugar.
  • Steep the tea in the water until the liquid has completely cooled to room temperature.
  • Once cooled, remove and discard the tea bags. Pour the sweetened tea in your gallon canning jar.
  • Add your scoby to the liquid.
  • Pour in your cup of brewed kombucha.
  • Cover the liquid and allow it to hang out for a week or so. Try to keep the container warm, but not hot. Between 75 and 85 degrees is ideal. The warmer the environment is, the faster the scoby will grow. You can let your batch go anywhere from a week to 3 weeks.
  • After a week or so, test your batch! This is where personal preference comes in. Some people, like me, like their kombucha very acidic. Some people like it a little more sweet. The longer you let the kombucha sit, the more acidic it will become, because the longer it sits the more sugar the scoby eats.
  • When you are ready to bottle, just remove the scoby (you will now have two: your original scoby you started with and a new one that has grown on the surface of the kombucha), along with 1 cup of the kombucha liquid that you will reserve for using in the next batch.
  • Store finished kombucha in a sealed container (like a glass jar) in the refridgerator.

Tweet
Pin
Share
0 Shares

Filed Under: Beverages, Fermented, Health, Homemade, In The Kitchen, Recipes

Previous Post: « Our Homestead
Next Post: How To Render Lard In The Crockpot »

Reader Interactions

Trackbacks

  1. Raw Milk Kefir Recipe - Wilson Homestead says:
    November 30, 2020 at 7:20 am

    […] How to make kombucha […]

    Reply
  2. Easy Sauerkraut Recipe - Wilson Homestead says:
    April 8, 2021 at 7:08 am

    […] beneficial bacteria that can be found in lots of fermented foods like kombucha, yogurt, kefir, and sauerkraut, helps increase your gut bacteria. Regular consumption of fermented […]

    Reply

Leave a Reply Cancel reply

Your email address will not be published. Required fields are marked *

Recipe Rating


Primary Sidebar

Join the Wilson Homestead community!

* indicates required

Most recent posts

  • How to test your cow for A2/A2
  • Holiday Gift Guide 2024
  • The Car Birth Story Of Elodie Charlotte
  • Preventing tooth decay in pregnancy
  • How to handle raw milk properly
  • Clean the air in your home
  • Prenatal vitamin regimen
  • Apple Cider Jello for Fall
  • What I Keep On Hand For Ticks
  • How to calf share

Blog Categories

  • Ancestral Eating (24)
  • Baby (12)
  • Baking (11)
  • Beverages (10)
  • Birth (10)
  • Breakfast (7)
  • Breastfeeding (4)
  • Canning (12)
  • Christmas (9)
  • Cleaning (6)
  • Cloth Diapering (2)
  • Coffee (5)
  • Curing Meat (2)
  • Decor (4)
  • Dehydration (1)
  • Dogs (1)
  • Farm Animals (4)
  • Farming (17)
  • Fermented (11)
  • Food Preservation (9)
  • Foraging (1)
  • GAPS Diet (8)
  • Garden (7)
  • Handmade Home (11)
  • Health (42)
  • Healthy Snacks (5)
  • Herbs + Natural Healing (7)
  • Homemade (57)
  • Homesteading (27)
  • In The Kitchen (61)
  • Markets (1)
  • Marriage (2)
  • Menstural Cycle (3)
  • Milk Cow (10)
  • Minimalism (2)
  • Motherhood (18)
  • Natural Health (17)
  • Non-Toxic Beauty (6)
  • Our Farmhouse (21)
  • Our Farmhouse On Acreage (7)
  • Our Home (28)
  • Our Old Farmhouse In Town (9)
  • Postpartum (10)
  • Poultry (2)
  • Pregnancy (13)
  • Preparedness (5)
  • Products (9)
  • Recipes (64)
  • Remedies (1)
  • Renovation (10)
  • Reviews (1)
  • Shepherdess (1)
  • Sleep (1)
  • Soapmaking (1)
  • Sourdough (6)
  • Supplements (4)
  • Sustainable Clothing (1)
  • Uncategorized (2)
  • Videos (5)
  • Zero Waste (3)

Wilson Homestead Podcast

Wilson Homestead
Wilson Homestead

Simple life in the farmhouse. And all the things I’m passionate about! Motherhood, homesteading, food from scratch, a handmade home!

Listen OnApple PodcastsListen OnExternal
10 Reasons Why We Chose Muscovy Ducks (And Why You Should Too)
byMegan Wilson

Never miss new content! Sign up for our email list here

All my videos are on Odysee as well!!

This post may contain affiliate links, which means I make a small commission at no extra cost to you. As an Amazon Associate, I earn from qualifying purchases. Shop the Wilson Homestead Amazon shop

Enroll in Doterra

Enroll in Young Living

WATCH SOME YOUTUBE VIDEOS \\

Farmhouse playlist 

Homesteading playlist

My pregnancy playlist

WHERE ELSE CAN YOU FIND US? \\

MAILING ADDRESS: PO BOX 921 Hamilton, Mt 59840

MY BLOG

MY WEBSITE

HANDMADE PRODUCT SHOP

INSTAGRAM

FACEBOOK

PATREON

MY ETSY SHOP

10 Reasons Why We Chose Muscovy Ducks (And Why You Should Too)
May 7, 2022
Megan Wilson
Results I’ve Seen From The GAPS Diet | How has it been going?
March 31, 2022
Megan Wilson
Our Natural + Healthy Dental Routine | Re-mineralizing + Healing Tooth Decay
March 23, 2022
Megan Wilson
I started the GAPS diet | Why the GAPS diet? And what is it? Let’s chat!
January 17, 2022
Megan Wilson
What I Used Most Postpartum After Baby #3 | Postpartum Essentials & Favorites
December 6, 2021
Megan Wilson
Why Luke Is Starting The Keto Diet | What Is Keto? | Part 1
December 3, 2021
Megan Wilson
2 & 3 Month Postpartum Mama Update | Pelvic Floor Physical Therapy, Thyroid, Weight Loss, Core Work
November 12, 2021
Megan Wilson
Vivian’s 2 & 3 Month Update
November 8, 2021
Megan Wilson
The Home Water Birth Of Vivian Louise | Positive Home Birth Story
November 1, 2021
Megan Wilson
Making Breastmilk Jewelry?? Lackto Breastmilk Jewelry Kit Instructions | Beautiful Nursing Keepsake
October 29, 2021
Megan Wilson
Search Results placeholder

Blog Archives

Footer

Subscribe

* indicates required

Copyright © 2025 Wilson Homestead on the Foodie Pro Theme